Instalasi OpenStack Tanpa Script

Pada blog post kali ini akan dibahas tentang instalasi OpenStack tanpa menggunakan distribusi populer (yang sudah scripted) seperti Mirantis, DevStack. Dengan melakukan instalasi tanpa script, akan lebih mudah memahami tentang services yang ada di OpenStack seperti Horizon, Nova, Neutron, dll.

Hardware yang digunakan adalah sebagai berikut:

  1. Server dengan dual processor X5570, 24GB memory sebagai compute node.
  2. Laptop dengan quad core Intel i5-2520M, 10GB memory sebagai controller node.

Referensi utama yang digunakan adalah http://docs.openstack.org/liberty/install-guide-ubuntu/overview.html dengan beberapa catatan sebagai berikut:

  1. Pastikan tidak ada error ketika melakukan copy-paste commands. Jika ada error atau output tidak sesuai dengan dokumentasi, hentikan proses instalasi dan lakukan troubleshooting.
  2. Catat setiap username dan password yang dibuat karena akan dibutuhkan dalam step-step berikutnya.
  3. Pilih opsi 2 pada bagian Networking yaitu “Self-service network”.
  4. Skip bagian Block Storage dan Object Storage. Hal ini karena arsitektur yang digunakan adalah 2 server: 1 controller node dan 1 compute node.
  5. Pastikan verifikasi dapat dilakukan dengan baik.

Berikut adalah beberapa screenshot hasil instalasi:

  • Horizon dashboard

Screen Shot 2016-05-04 at 10.00.28 AM

  • Private VM pada private network

Screen Shot 2016-05-04 at 10.17.33 PM

  • Membuat stack dengan suatu heat template

Screen Shot 2016-05-04 at 11.39.38 PM

Implementasi Parallel Computing di Private Cloud (2)

Sambungan dari tulisan sebelumnya..

OK sekarang masuk ke bagian pertama yaitu Instalasi dan Konfigurasi OpenStack. Langkah-langkah yang diperlukan sebagai berikut:

1. Instalasi VMware Fusion di host OS, Mac OS X Yosemite. Ga ada custom config yang diperlukan, next next aja..

2. Buat 3 VM kosong sesuai dengan spesifikasi di tabel berikut

VM specs

2.1. Configure Networking di VM

$ sudo /Applications/VMware\ Fusion.app/Contents/Library/vmnet-cfgcli vnetcfgadd VNET_3_VIRTUAL_ADAPTER yes
$ sudo /Applications/VMware\ Fusion.app/Contents/Library/vmnet-cfgcli vnetcfgadd VNET_3_DHCP no
$ sudo /Applications/VMware\ Fusion.app/Contents/Library/vmnet-cfgcli vnetcfgadd VNET_3_HOSTONLY_SUBNET 10.20.0.0
$ sudo /Applications/VMware\ Fusion.app/Contents/Library/vmnet-cfgcli vnetcfgadd VNET_3_HOSTONLY_NETMASK 255.255.255.0
$ sudo /Applications/VMware\ Fusion.app/Contents/Library/vmnet-cfgcli vnetcfgadd VNET_4_VIRTUAL_ADAPTER yes
$ sudo /Applications/VMware\ Fusion.app/Contents/Library/vmnet-cfgcli vnetcfgadd VNET_4_DHCP no
$ sudo /Applications/VMware\ Fusion.app/Contents/Library/vmnet-cfgcli vnetcfgadd VNET_4_HOSTONLY_SUBNET 172.16.0.0
$ sudo /Applications/VMware\ Fusion.app/Contents/Library/vmnet-cfgcli vnetcfgadd VNET_3_HOSTONLY_NETMASK 255.255.255.0
$ sudo /Applications/VMware\ Fusion.app/Contents/Library/vmnet-cli --configure
$ sudo /Applications/VMware\ Fusion.app/Contents/Library/vmnet-cli --stop
$ sudo /Applications/VMware\ Fusion.app/Contents/Library/vmnet-cli --start

2.2. Create Fuel VM

Screen Shot 2015-01-10 at 11.19.51 PM Screen Shot 2015-01-10 at 11.20.06 PM

Screen Shot 2015-01-10 at 11.20.19 PMScreen Shot 2015-01-10 at 11.21.04 PM

Screen Shot 2015-01-10 at 11.21.25 PMScreen Shot 2015-01-10 at 11.22.06 PM

Screen Shot 2015-01-10 at 11.21.42 PMScreen Shot 2015-01-10 at 11.22.27 PM

Screen Shot 2015-01-10 at 11.34.35 PMScreen Shot 2015-01-10 at 11.41.37 PM

bersambung..

Implementasi Parallel Computing di Private Cloud (1)

Semester kemarin dapat tugas untuk bikin paper terkait dengan mata kuliah Arsitektur Komputer Lanjut. Setelah bingung cari-cari topik, akhirnya dapat ide untuk coba implementasi parallel computing pake Open MPI di private cloud. Private cloud dibangun pake software OpenStack. Nah, pada tulisan kali ini akan coba dibahas step-step yang diperlukan.

Software-software yang digunakan:

1. OpenStack. Software open source ini digunakan untuk membuat dan me-manage private cloud.

2. VMware Fusion. Software ini digunakan sebagai hypervisor dari OpenStack nodes. Disini model implementasinya nested VM, jadi VM di dalam VM. Kenapa? Karena cuman ada satu komputer yang dipakai dan host OS nya Mac OS X Yosemite. Oh ya, VirtualBox ga bisa dipake karena ga support nested VM. VMware Fusion ada versi trial-nya, lumayan buat coba-coba.

3. Mirantis Fuel. Software ini digunakan untuk membangun OpenStack. Jadi nggak install OpenStack dari nol. Kenapa? Ribet :). Fuel sayang-nya hanya support multinodes OpenStack-type installation, di mana minimal harus ada dua nodes: satu sebagai controller satu sebagai compute (+cinder).

4. Open MPI. Software yang digunakan untuk komputasi parallel.

Oh ya, untuk guest OS, bisa pilih Ubuntu atau CentOS.

Spek dari host OS (Mac OS X Yosemite):
  • Intel Core i7 2.3 GHz
  • 16 GB 1600 MHz DDR3
  • 500 GB Flash Storage

Nah, sekarang untuk skenario-nya sbb:

Skenario
Di testbed ini, seperti dilihat pada gambar, ada 3 VM: Fuel VM, OpenStack Controller VM, OpenStack Compute VM. Ini minimum konfigurasi, bila perlu nantinya kita bisa tambahkan node lagi misalnya sebagai OpenStack compute node. Berikut spesifikasi dari masing-masing VM:
VM specs
Nah sekarang langkah-langkahnya. Pada dasarnya, implementasi testbed dapat dibagi menjadi 2 bagian besar:
  1. Instalasi dan Konfigurasi OpenStack
  2. Instalasi dan Konfigurasi Open MPI virtual cluster

Biar gak panjang, tulisannya bersambung ke bagian berikutnya..

OpenMP dan OpenMPI

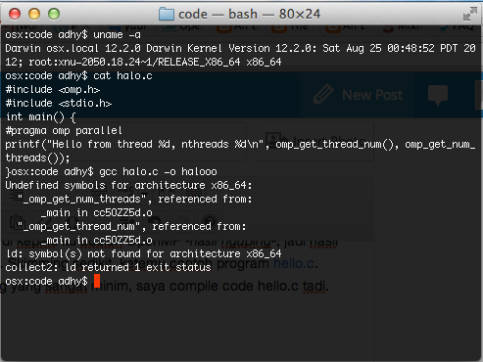
Disela kesibukan bikin presentasi buat training, iseng-iseng ngerjain tugas. Tugas-nya sederhana, nge-test source code di buku Introduction to Parallel Computing halaman 228. Matkul ini kebetulan diambil setelah PRS kemarin jadi gak mudheng blas ini mainan tugas apaan. Ntah kenapa, yang teringat di kepala itu adalah OpenMP -hasil nguping-, jadi hasil dari googling adalah situs OpenMP. Skimming sedikit, ketemu contoh program hello.c. Berbekal kemampuan programming yang sangat minim, saya compile code hello.c tadi. Hasilnya? Berantakannn..

Image


Selidik-punya-selidik, karena code tadi mengandung fungsi di library openmp maka compiler harus dikasih tau kalo kita mo pakai openmp untuk nge-compile code tersebut. Ulang deh..

Image


Dengan pede-nya saya anggap tugas selesai karena mestinya klo contoh program di web sukses di-compile, contoh di buku pasti bakalan sukses di-compile juga. Etapi…

Image


Apalagi nih ??!!!

Setelah diperhatikan baik-baik, disitu tertulis MPI..hmm apa ya itu. Googling lagi, dan nemu situs Open MPI. Dem, apaan lagi nih, apa bedanya sama OpenMP tadi??!!!

Dengan sangat baik hati, Mas Darmawan menjelaskan perbedaannya sebagai berikut:

However, after studying them both further, it’s clear that OpenMPI uses a distributed-memory architecture while OpenMP uses shared-memory model. Both of the memory architecture can be explained as follows:

  • In a distributed-memory architecture, each process doesn’t share the same address space as the other process (which very possibly run on different machine). This means each process cannot “see” the other process variable(s). The process must “send a message” to the other process to change variable in the other process. Hence, the “Massage Passing Interface (MPI)”. The MPI library such as OpenMPI basically is a sort of “middleware” to facilitate the massage passing between the processes, the process migration, initialization and tear-down.
  • In a shared-memory architecture, there is usually one process which contains couple of threads which share the same memory address space, file handles and so on. Hence, the shared memory name. In this architecture, each threads can modify a “precess” global data. Therefore, a semaphore mechanism must be in use. OpenMP simplify the programming for shared memory architeture by providing compiler “extensions” in the form of various standardized “pragma”s. 

Saya mah cuman nangkep yang distributed-memory sama shared-memory doang 😀

Bagus.. saatnya nyobain OpenMPI. Setelah proses download dan ./configure && make && sudo make install khas tukang install seperti saya, OpenMPI sukses tertanam di mac saya.

Sekarang saatnya nge-test program yang di buku.

Image


Siip, berhasil!!!

Lantas itu maksudnya apa?

I’ll take that as my homework

*standar jawaban saya di milis se at bandel dot com kalo gak mudheng tentang sesuatu*


Ubuntu on Thinkpad Edge e125

Recently, I purchased Thinkpad Edge e125 to replace my previous Thinkpad X100e which now is being used by my sister. We, myselft and wife, has been happy using thinkpad 12″ series. They are slim, light and durable. I also love the design, which to my opinion is simple.

As Ubuntu is our favorite Linux distribution and my wife is using it at her office, so this time again, we’d like to have Ubuntu in this Thinkpad. Latest version that I have is 11.04 (natty narwhal) so, at first I installed this version. It was a bit disappointing that screen resolution was only 1280 x 720 maximum. Then I got myself latest Ubuntu distribution, 12.04 (precise pangolin), re-installed (I remember there was no option to upgrade from 11.04 to 12.04) on the same disk partition and voilà…the nice 1366 x 768 resolution showed perfectly!

The good thing is that this is not just stop right here, there are some problems adjustments that needs to be done. The “Dash Home” does not show anything while it should shows some recent applications icons, recent documents, etc. Turns out that this was a bug and already fixed. As I did fresh install, easiest thing is just to update and upgrade. Problem was solved.

Another new thing is name server configuration. In Ubuntu 12.04, changing name server definition is using new approach, instead of editing /etc/resolv.conf. There is an explanation in http://www.stgraber.org/2012/02/24/dns-in-ubuntu-12-04/ , but I’d rather to choose method on http://www.liberiangeek.net/2012/05/setup-static-dns-servers-in-ubuntu-12-04-precise-pangolin/. As I connect through wifi, after editing /etc/dhcp/dhclient.conf, I need to “sudo restart network-manager” to make changes take effect.

That’s it for now!

Marhaban Ramadhan

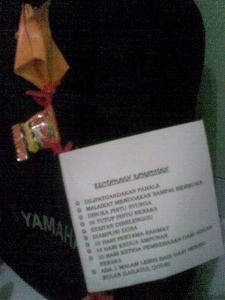
It was a bright morning as usual. I was having my breakfast near my place when I saw kindergaten students were marching toward me. They brought along flower made from paper on their hands. One of the girls, gave one flower to me then smiled. I smiled back and said thanks. On the flower, there was a written paper about Ramadhan. Here are some pictures of it. Happy Ramadhan!
19082009(013)19082009(012)

Surprise [again]!

Today, when I was at meeting, unknown number called in. I didn’t pick it up ’till the third call. A guy over the phone said to me that he was at my office to deliver a cake. *What??!!* He then mentioned my name correctly assuring me that I was the correct person to receive the cake. Suddenly, I could see my wife in my mind. She must sent this cake as she did when I was at my first day in NSN :-).

Thanks dear, my pray and my love always for you…

bday cake

bday cake

3 months

I’m back !

Been working to the company I work now, I rarely visit this blog and write something. Kinda busy heh. New environment with many new things made me allocate more times to manage work-related issues. Sometimes jobs suck ! But still, the need of money conquers.

Anyway, for my own review, I’d like to breakdown what the differences are.

1. Money
I’m well paid. At least from info I gathered from my colleagues which work in the similar company. When I was student, my salary was only around 15% of my current salary. Yep, I need money, but money is’t everything.

2. People
My friendster and flickr contact list do not significantly increase as my linkedin.

3. Networking knowlege
Many new things I’ve been learning, unfortunately only a few I have deep enough understanding.

4. Open Source related project
Have no time to just play around :-(.

5. Book reading
Only work-related books/e-books. Doh !

6. Photography skill
Less practice than when I was still in college.

7. Others ? TBA! 😀

So the question is : Why still I work ?

Preparing to fulfil my whishlists, later…

Terima Kasih

I would like to express my gratitude to everyone who help me finishing my diploma thesis. I would prefer writing it in Bahasa Indonesia.

Alhamdulillah, segala puji bagi Alloh Azza wa Jalla, Tuhan sekalian alam yang khususnya telah mengizinkan saya untuk menyelesaikan tugas akhir saya ini dan mendapatkan gelar sarjana teknik elektro.

Ayah, Ibu, Mas dan Mbak dan Dek Mita, keluarga yang selalu ada, penuh cinta dan penuh keceriaan. Matur nuwun…

Terima kasih saya ucapkan kepada Pak Eueung Mulyana sebagai pembimbing saya yang telah memberikan saya kesempatan untuk mengerjakan tugas akhir di bawah bimbingan beliau. Tanpa beliau, mungkin saya tidak bisa menyelesaikan tugas akhir saya ini. Nuhun atas diskusi-diskusinya pak..Terima kasih juga kepada Pak Hendrawan sebagai pembimbing 1 yang disela-sela sibuknya, masih bisa saya temuin untuk diminta tanda tangannya. Makasih pak…

Terima kasih juga saya ucapkan untuk Pak Soehartono, Pak Soegihartono dan Ibu Chairunnisa sebagai tim penguji sidang tugas akhir saya. Saya pikir dapat 90, tp 80 itu sudah lebih dari cukup buat saya kok pak, bu 😉

Kemudian, saya ucapkan terima kasih kepada Om Basuki Suhardiman yang telah mengizinkan saya untuk mengambil data dari jaringan ITB. Terima kasih juga buat teman-teman di CNRG : Mas Wahyu Hidayat dan Mas Affan Basalamah atas diskusi-diskusinya tentang jaringan ITB. Kemudian juga buat Mas Rendo Ariya Wibawa dan Mas Achmad Husni Thamrin, yang telah bersedia berdiskusi dan menjawab pertanyaan-pertanyaan bodoh saya tentang Interdomain routing dan BGP. Ah. hampir lupa ! Juga buat Galih yang udah nyediain data netflow. Makasih, Gal !

Buat Igun, makasih banyak atas diskusi-diskusinya, bantuannya bikin grafik pake Excel 2007 sori, aku saiki biasa nganggo Ooo :p dan atas bolehnya nge-print pake printer TI yang keren :D. I owe you, dude !

Matur suwun buat Bos Halim, owner Cibuku.com yang telah membantu saya debugging perl script yang saya buat.

Many thanks goes to Dr. Bruno Quoitin, author of C-BGP, whom very kind discussing about Interdomain Routing and C-BGP with me.

Terima kasih buat temen-temen ARC khususnya angkatan cap-cay : Domplenk, Anto, Aris Dolop, Alex, Azi, Alfa, Jaya, Andi, Igun, Tiko. Friendship lasts forever..

Terima kasih juga buat teman-teman seperjuangan di Lab Telematika ITB : Adit, Boma cepet lulus guys !, Mata, Rizal, Panji, Budi, Ronald, dan banyak lagi yg sering nongkrong di Lab Telmat. Terima kasih juga untuk kawan-kawan seperjuangan di kost sadang serang : Dana genki desu ka ?, Uzan how’s s’pore?, Toha, Bambang kapan kawin?, Evan selamat berjuang kangmas !, Megi, Ishan, Deva, Ichwan, Wawan ojo CS-an terus, rek !; tetangga satu RW : Dea, Miftah, Wiwit, Rian wis nang CNOOC yo ? selamat !, Sahal, Irawan. Buat yang baru pulang dari negeri antah berantah , Tiko, matur nuwun, dab.

Saya juga ingin mengucapkan terima kasih buat direksi dan karyawan LAPI ITB, tempat saya “menyambung hidup” bekerja paruh waktu jadi admin jaringan. Nuhun bapak-bapak..ibu-ibu…

Terima kasih juga buat temen-temen di milis el02(at)itb.ac.id, kapan jadi numero uno ?. Temen-temen di TJAKRA(at)yahoogroups.com, tahun ini ada syawalan ?

Last but not least, to my luph, Lani, yang dengan penuh kesabaran dan kasih sayang 🙂 menemani hari-hari penuh perjuangan kemaren, saat ini dan semoga-insya ALLOH- hari-hari penuh perjuangan di masa depan.

Semoga tugas akhir saya ini dapat bermanfaat. Dan tunggu kelanjutannya akhir tahun ini, insya ALLOH !

Bandung, Sep 26 2007


-adhy
PS : ini bukan format resmi dalam buku tugas akhir :p